Introduction
Naturally, microorganism exists in all places and surrounding environment. So, it is difficult to find the original habitat of the microorganism. Factitious condition in laboratory is created to cultivate this microorganism. A growth medium or culture medium is a liquid or gel designed to support the growth of microorganisms or cells, or small plants. There are different types of media for growing different types of cells. The most common culture media for microorganisms are nutrient broths and agar plates, specialized media are sometimes required for microorganism and cell culture growth. While, culture media are available commercially as powders, they require only the addition of water .Nutrient medium is a general purpose preparation for culturing microorganisms which are not nutritionally fastidious .The broth contains :
3.0g/L “Lab-lemco” poeder (a beef extract)
2.0g/L yeast extract
5.0g/L peptone (a nitrogen source)
5.0g/L sodium chloride
2.0g/L agar powder
The agar has the same composition, except that it contains 15g/L agar. The final pH of both media is 7.4.
Media preparation guidelines:
- Always read the label on the container of the medium before use. Verify and record the medium, the manufacturer ,and the expiry date.
- Accurately weigh or measure all ingredients and add them according to the instructions for the procedure being used.
-Use distilled or deionized water.
-If the medium contains agar, stir continuously and heat to boiling before dispensing into bottles. Agar melts (as evident by medium clearing in boiling aqueous solution. Agar is generally used at 15g/L, although this may vary depending on the medium and use.
An autoclave is an instrument used to sterilize equipment and supplies by subjecting them to high pressure saturated steam at 121 °C or more, typically for 15–20 minutes depending on the size of the load and the contents. The various media constituents and other reagents used in cell cultures must be carefully sterilized either by autoclaving or by filtration. Materials for sterilization are placed in the chamber, the door is sealed, and pressurized steam is forced into the chamber .The incoming steam displaces cooler air through an exhaust valve , this valve closes when the cell cooler air has been vented.
Objective
Refer to the lab manual.
Material and reagents
Ready-made commercial nutrient agar
Balance
Distilled water
Scott bottles
Measuring cylinder
Beaker
Forcep
Universal bottles
Procedure
Refer to the lab manual.
Discussion
These agar plates provide a solid medium on which microbes may be cultured. They remain solid, as very few bacteria are able to decompose agar. Bacteria had grown in liquid cultures often form colloidal suspensions.
There are many steps to be taken in the process of preparing culture medium. We cleaned the pan and inside of the balance with a brush before we weighted the culture medium powder so that it is free from anything on or around its surface that can affect our readings. The “tare” button can only press after the container is put onto the balance to get the accurate reading. In addition, the distilled water was measured using measuring cylinder. The water should not pour all into beaker, because there should be some distilled water reserved for washing of leftover powder from the weighing container into beaker. The correct amount of distilled water is added to make sure we produced the correct composition of culture media. After the distilled water is added to the culture medium powder, we using rod to stir the media so that the all powder form culture medium dissolved in water. In the final step when the entire medium has been poured into the Scott bottles, we labelled each of the bottles and loosen the cap of the bottle before putting them into autoclave machine. This is because the autoclave works under high steam pressure. Therefore we loosen the cap to allow the expansion of the bottle so that the bottle will not break. After autoclaving, the Scott bottles were removed from the autoclave machine and the cap of the bottle is tightened. The bottles should be turned over again for a few times so that no agar will solidify at the bottom of the bottle. This is to make sure that the culture agar can be used for the pour-plate in the next laboratory work.
Conclusion
Bacteriological media have a wide range of types. Nutrient Agar is a complex medium because it contains ingredients with contain unknown amounts or types of nutrients. Nutrient Agar contains Beef Extract (0.3%), Peptone (0.5%) and Agar (1.5%) in water. Beef extract is the commercially prepared dehydrated form of autolysed beef and is supplied in the form of a paste. Peptone is casein (milk protein) that has been digested with the enzyme pepsin. Peptone is dehydrated and supplied as a powder. Peptone and Beef Extract contain a mixture of amino acids and peptides. Beef Extract also contains water soluble digest products of all other macromolecules (nucleic acids, fats, polysaccharides) as well as vitamins and trace minerals. Although we know and can define Beef Extract in these terms, each batch cannot be chemically defined.
There are many media ingredients which are complex: yeast extract, tryptone, and others. The advantage of complex media is that they support the growth of a wide range of microbes. Agar is purified from red algae in which it is an accessory polysaccharide (polygalacturonic acid) of their cell walls. Agar is added to microbiological media only as a solidification agent. Agar for most purposes has no nutrient value. Agar is an excellent solidification agent because it dissolves at near boiling but solidifies at 45°C. Thus, one can prepare molten (liquid) agar at 45°C, mix cells with it, and then allow it to solidify thereby trapping living cells. Below 45°C agar is a solid and remains so as the temperature is raised melting only when >95°C is obtained.
The ready make nutrient agar is autoclaved at 121°C for 15 minutes. Autoclaving is a process that use moist heat and pressure so that all parts of the material to be sterilized. An autoclave is, in essence, a large pressure cooker. A chamber must be sealed off against surrounding air. Materials for sterilization are placed in the chamber. The door is sealed, and pressurized steam is forced into chamber. The incoming steam displaces cooler air through an exhaust valve. This valve closes when the cell cooler air has vented.
Steam is continually forced into the chamber until the pressure reaches 103kPa above atmospheric pressure at sea level. This pushes the temperature in the chamber to 121°C. The high pressure prevents solutions from boiling over at this temperature. Larger volumes require longer than 15 minutes to heat up to 121°C throughout. After sterilization, the steam pressure is slowly decreased to atmospheric pressure. The sterilized objects can then be removed.
Reference
http://en.wikipedia.org/wiki/Growth_medium
http://en.wikipedia.org/wiki/Agar_plate
http://en.wikipedia.org/wiki/Autoclave
http://www.studentsguide.in/animal-biotechnology/animal-cell-and-tissue-culture/preparation-and-sterilization-of-medium.html
http://www.bd.com/ds/technicalCenter/inserts/Nutrient_Agar.pdf
http://www2.fiu.edu/~makemson/MCB2000Lab/Exp3MediaPrep.pdf
http://en.wikipedia.org/wiki/Agar
http://www.cabri.org/guidelines/micro-organisms/M203Ap1.html
Sunday, 27 March 2011
Sunday, 20 March 2011
Lab 2:Measurement And Counting Of Cells Using Microscope
2.1 Ocular Micrometer
Introduction
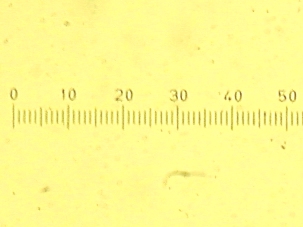
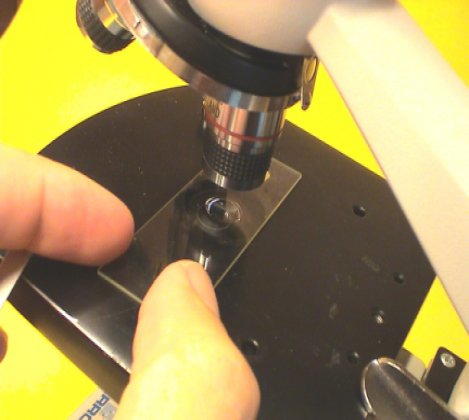
An ocular micrometer is a glass disk that fits in a microscope eyepiece that has a ruled scale, which is used to measure the size of magnified objects. The physical length of the marks on the scale depend on the degree of magnification. A microscope can be used not only to see very small things but also to measure them. Things seen in microscopes are so small that centimeters or even millimeters are too big. As a result, micrometers (or microns) are used. A micrometer, also written µm, is one thousandth of a millimeter - it's 10-6m. For this, a micrometer eyepiece is used in place of the standard eyepiece of the microscope. This has a series of numbered lines inside of it which make it look like a ruler (see image to the right, click on it to see a bigger version). The images below show what the eyepiece looks like (with its protective box) and where to put it on the microscope. Attach the ocular micrometer to the microscope eyepiece by unscrewing the eyepiece cap, placing the ocular micrometer over the lens and screwing the eyepiece cap back into place. Slide the stage micrometer onto the microscope slide stage. Adjust the microscope to the lowest possible magnification. Move the stage micrometer until the measurement marks on the ocular micrometer superimpose with the measurement marks on the stage micrometer. By determining how many units of ocular micrometer superimpose a known distance on the stage micrometer, we can calculate the exact distance each ocular division measure on the microscopi field. When we change the objectives we must recalibrate the system. After calibration of the ocular micrometer, the stage micrometer is replaced with a slide containing microorganism. The dimensions of the cells may then be determind.


Ocular micrometer
Whenever there is a need to make measurements with an ocular micrometer, there is also a need to ensure that the microscope is calibrated. The use of a stage micrometer to check the divisions and measurements on the ocular micrometer is the best way to achieve this calibration. There are a number of factors that can influence the true calibration:
Errors that may influence the correct measurement of a subject:
- Any inherent inaccuracies of the objective lenses.
- Inaccuracies in the ocular micrometer scale.
- Human error in taking the measurement.

Examples of ocular micrometer
Procedure
Refer to the manual
Result
40 magnification
Observation | Length,mm | Width, mm |
1 | 3.25 | 1.50 |
2 | 3.25 | 1.50 |
3 | 3.50 | 1.75 |
4 | 3.75 | 1.50 |
5 | 3.25 | 1.25 |
6 | 3.50 | 1.50 |
7 | 3.50 | 1.75 |
8 | 3.50 | 1.50 |
9 | 3.75 | 1.25 |
10 | 3.25 | 1.50 |
Total | 34.50 | 15.00 |
100 magnification
Observation | Length,mm | Width,mm |
1 | 3.4 | 1.1 |
2 | 3.3 | 1.0 |
3 | 3.3 | 1.1 |
4 | 3.5 | 1.1 |
5 | 3.3 | 1.2 |
6 | 3.4 | 1.0 |
7 | 3.4 | 1.1 |
8 | 3.3 | 1.0 |
9 | 3.3 | 1.1 |
10 | 3.5 | 1.2 |
Total | 33.7 | 10.9 |
400 magnification
Observation | Length,mm | Width,mm |
1 | 2.875 | 0.925 |
2 | 2.925 | 0.950 |
3 | 2.925 | 0.925 |
4 | 2.900 | 0.900 |
5 | 2.925 | 0.950 |
6 | 2.875 | 0.925 |
7 | 2.900 | 0.925 |
8 | 2.900 | 0.925 |
9 | 2.925 | 0.900 |
10 | 2.900 | 0.900 |
Total | 29.05 | 9.225 |
Discussion
Way to identify the length of each division in ocular micrometer scale:
A typical scale consists of 50 - 100 divisions. We adjusted the focus of the eyepiece in order to make the scale as sharp as possible. The ocular scale must be calibrated, using a device called a stage micrometer. A stage micrometer is simply a microscope slide with a scale etched on the surface. A typical micrometer scale is 2 mm long and at least part of it should be etched with divisions of 0.01 mm (10 µm). The convension factor involved is calculated as the examples below.
The stage micrometer scale has divisions that are equal to 0.01 mm, which is 10 micrometers (µm).The scale is lined up with the ocular scale, and at 40 power of magnification it is observed that each micrometer division covers the same distance as 10 ocular divisions. Then one ocular division (smallest increment on the scale) = 1 µm at 10 power. The conversion to other magnifications is accomplished by factoring in the difference in magnification.
The calibration would be 2.5 µm at 40magnification,1 µm at 100 mignification and 0.25 µm at 400magnification.
The calibration would be 2.5 µm at 40magnification,1 µm at 100 mignification and 0.25 µm at 400magnification.
For 40 power of magnification,
Average length | = Total of exact distance Number of observation |
= 34.50 10 | |
= 3.45mm |
Average width | = Total of exact distance Number of observation |
= 15.00 10 | |
= 1.50mm |
For 100 power of magnification,
Average length | = Total of exact distance Number of observation |
= 33.70 10 | |
= 3.37mm |
Average width | = Total of exact distance Number of observation |
= 10.9 10 | |
= 1.09mm |
For 400 power of magnification,
Average length | = Total of exact distance Number of observation |
= 29.05 10 | |
= 2.905mm |
Average width | = Total of exact distance Number of observation |
= 9.225 10 | |
= 0.9225mm |
Some stage micrometers are finely divided only at one end. These are particularly useful for determining the diameter of a microscope field. One of the larger divisions is positioned at one edge of the field of view, so that the fine part of the scale ovelaps the opposite side. The field diameter can then be determined to the maximum available precision.
In summary, these conversion factors can be apply to state each division of the eyepiece reticle is measured for a selected magnification.
X40 1 small division = 2.5 μm
X100 1 small division = 1.0μm
X400 1 small division = 0.25μm
Ways for estimating and reporting dimensions:
We must be aware that even under the best of circumstances, the limit of resolution of the microscope is 1 or 2 µm (or worse) at any dry magnification, and 0.5 µm in oil immersion. We can’t directly measured linear dimension or value that is calculated from a linear dimension.The linear dimension should be reported with implied accuracy that is better than that. This includes means, surface areas,volumes, and any other derived values.

Examples
Conclusion
- Ocular micrometer serves as a scale or rule. Ocular micrometer is simply a disc of glass upon which are etched lines.
The scale on ocular micrometer does not have any standard value. We can find out the value of one division of this unknown scale by calibrating it with a known scale.
Thus actual value of one division of ocular micrometer is found by using another known scale, the stage micrometer. Stage micrometer is simply a microscope glass slide having in its centre a known (one millimeter) distance etched into 100 equally spaced divisions. Ocular micrometer is, therefore, calibrated under different objective lens systems of the microscope.
By determining how many divisions of ocular micrometer superimpose a known distance on the stage micrometer we may find out the exact value of one division of ocular micrometer in the microscope field. Once calibrated, the ocular micrometer can be used to measure the size of various microbes in terms of length, breadth, diameter.
Therefore, the dimensions of a microscopic object are measured with the aid of (i) special ocular containing graduated scale called ocular micrometer and (ii) stage micrometer. The measurements of a microscopic object required, first the standardization or calibration of ocular micrometer with the stage micrometer. This is done by replacing the normal eyepiece of the microscope with the ocular micrometer. Then looked through, the ruled lines of ocular micrometer is observerd.
When looked through normal ocular, the ruled lines of stage micrometer is observed. The suitable objective is used for the measurement of the specimen and ocular micrometer. The stage micrometer is brought to focus. So that the long axis of the two scales are aligned in parallel and the vertical rules of calibration lie over each other with both scales precisely in focus. The stage is moved so that one of the graduations of stage micrometer exactly coincides with the graduation of the ocular micrometer.Then, the scale is examined. Note: the situation above is repeated and the numbers of divisions of ocular micrometer are equivalent to the number of divisions of stage micrometer is calculated for every magnification.This is because the appearance of the ocular micrometer will not change with the changes in magnification(objective lenses),but the scale ont the stage micrometer will change with magnification.So, the ocular micrometer is needed to calibrated seperately with each objective lens. The value in terms of microns of one smallest scale union the ocular micrometer is derived.
The value of each division of ocular micrometer depends on the length of microscope body tube and the objective used. On completion of ocular micrometer calibration, the stage micrometer is removed and the specimen to be measured is placed. The specimen is focused and the number' of divisions covered by the specimen is counted. The size of the specimen is calculated by multiplying the number of divisions covered by the specimen with value of unit division.
Reference
2.2 Neubauer Chamber
IntroductionThe Neubauer Chamber is a device originally designed for the counting of blood cells. It is now also used to count other types of cells as well as other microscopic particles.Neubauer chamber is more convenient for counting microbes. Coverslips for Neubauer chambers are specially made and are thicker than those for conventional microscopy, since they must be heavy enough to overcome the surface tension of a drop of liquid. It contains two counting areas separated by a H-shape trough. The coverslip is placed over the counting surface prior to putting on the cell suspension. The area under the coverslip fills by capillary action. The charged counting chamber is then placed on the microscope stage and the counting grid is brought into focus at low power. It is essential to be extremely careful with higher power objectives, since the counting chamber is much thicker than a conventional slide. The chamber or an objective lens may be damaged if the user is not careful. The main divisions separate the grid into 9 large squares (like a tic-tac-toe grid). Suspensions should be dilute enough so that the cells or other particles do not overlap each other on the grid, and should be uniformly distributed. To perform the count, determine the magnification needed to recognize the desired cell type.


A Neubauer slide held in place on a microscope stand by a slide clamp.
Materials and ReagentsSerial dilutions of bacteria culturesNeubauer and coverslip70% ethanolSterile Pasteur pipettesProcedureRefer to the manual
Counting1. The chamber contains many grids, producing nine major large squares.2. For calculation purpose, only the middle large square is used.3. The middle large square has a size of 1mm x 1mm and a depth of 0.1mm.4. Inside the middle large square, there are 16 smaller squares, each with the size of 0.25mm x 0.25mm.5. Randomly choose 5 of these 16 smaller squares and calculate the number of cells in each of the square.6. Average the number of cell per square.

Results
3
2
11
2
0
1 small box = (1mm ÷ 4)
=0.25mm
Average of cell number = (3+2+11+2+0) ÷ 5
= 3.6
Volume of one small box = area x depth
= 0.25mm x 0.25mm x 0.1 mm
= 6.25 x 10⁻⁶mL
Concentration of cell = average of cell ÷ volume
= 3.6 ÷ (6.25 x 10⁻⁶mL)
= 576000 cells/mL
Discussion
In order to obtain accurate results from an experiment system and reduce variation within experiments it is essential the desired number of cells be known before the assay is started. Using a Neubauer chamber to count cells is still a widely used method, with a majority of labs containing at least one glassNeubauer chamber. The number of cells is usually expressed as cells/ml.
There are several key factors for counting using aNeubauer chamber. First, avoid improper filling of chambers (too much or too little). Second, representative sample taken is counted with the pipette and no air bubbles are trapped. In addition, the total number of chambers counted within theNeubauer chamber. Last but not least, the numbers of cells are counted.One of the few drawbacks of counting cells is that it can be labour-intensive, as well as not being able to distinguish between living and dead cells.
Cells that are on the line of a grid require special attention. Cells that touch the top and right lines of a square should not be counted, cells on the bottom and left side should be counted.
The lower the concentration, the more squares should be counted. Otherwise one introduces statistical errors. Way to find out one squareis to calculate the cell concentration per ml based on the numbers obtained from 2 different squares. If the final result is very different, then this can be an indication of sampling error.
Things that we need to pay more attention when carry out this experiment. First is the type of counting chambers. There are different types of counting chambers available, with different grid sizes. One counting chamber also has grids of different sizes. We must know the grid size and height (read the instruction manual) otherwise we’ll make calculation errors. Then, the cover glasses are used. They are thicker than the standard 0.15mm cover glasses. Therefore they are less flexible and the surface tension of the fluid will not deform them. This way the height of the fluid is standardized. Next we should pay attention on moving cell. Moving cells (such as sperm cells) are difficult to count. These cells must first be immobilized.The objective of Neubauer chamber is much thicker than a regular slide. Do not crash the objective into the Neubauer chamber when focusing.
Conclusion
The Neubauer chamber is a specimen slide which consists of a grid of etched squares of a given area and is covered with a glass slip that positioned a fixed distance from the etched surface. It is used to determine the concentration of cells in a liquid sample. Counts are usually made at about 400X magnification. The number of cells in a population can be measured by taking direct microscopic count usingNeubauer chamber(to larger eukaryotic microorganisms).Total number of microorganisms in a sample can be calculated taking the count of number of bacteria per unit area.The volume of liquid within the etched square equals the area of the square times the depth of the film. The average cell count per square multiplied by thr reciprocal of the volume in millilitres will equal the concentration of the microorganism in the diluent. Chamber factors commonly range from 4x10⁶to 2x10⁷. Thus the procedure is most applicable to foods that contain large microbial population. Cell counts obtained using Neubauer chamber is consistent. Therefore, Neubauer chamber is more convenient for counting microbes.
Referencehttp://en.wikipedia.org/wiki/Microscope_slide
http://en.wikipedia.org/wiki/Hemocytometer
http://www.emsdiasum.com/microscopy/products/magnifier/counting.aspx


Subscribe to:
Posts (Atom)